Closing Timing on an FPGA Design
Closing timing can be one of the most time-consuming parts of FPGA development: the tools report a violation, and someone has to figure out whether the constraints, the RTL, or the methodology is to blame, fix it, and re-run until the design is clean. This tutorial shows how NEX can take on that loop. We will use a RISC-V CPU prototype as our example: the design fails timing out of the box, and NEX will build the project, read the reports, diagnose the failure, propose fixes, and iterate until the 60 MHz specification is met.
Note
Before you begin, ensure you have installed the NEX CLI, Git, and AMD Vivado (2024.x or newer) with Artix-7 device support. NEX license and LLM configuration are covered in Settings Basics.
Follow along
The project files used in this tutorial are available in the ChipNexus tutorials repository.
The Challenge
An SoC team is bringing up an FPGA prototype of a CPU subsystem they did not write:
- The CPU is lowRISC Ibex, a production-grade open-source RISC-V core (the CPU of OpenTitan). It is third-party IP: project rules forbid modifying it.
cpu_wrapper.svis the team's integration wrapper. It instantiatesibex_topwith the project's configuration and adds a prototype-only debug aid: a bus signature register (a MISR) that folds recent data-bus addresses into a running hash for post-mortem analysis.fpga_top.svis a 4-pin prototype harness that lets the CPU macro be timed standalone: static inputs are tied off exactly as the SoC ties them, dynamic inputs enter through a shift chain, and outputs leave through a boundary-registered XOR compressor. Every CPU-internal timing path stays real.docs/prototype-spec.mdis the project specification: the 60 MHz clock requirement on an Artix-7 100T (xc7a100tfgg484-1), the debug signature's latency allowance, and the signoff criteria.
Setting Up the Workspace
Clone the tutorial assets and the Ibex sources, then build the flat staging area inside the project folder:
git clone https://github.com/ChipNexus/nex-tutorials
cd nex-tutorials/timing-closure-fpga
git clone https://github.com/lowRISC/ibex
git -C ibex checkout 8ed87e07e3331561bce93af1568d9b376948e701
chmod +x setup_staging.sh
./setup_staging.sh ibex riscv-soc-prototype/rtl_staging
Everything the project needs is now under riscv-soc-prototype/: the staged RTL, the
constraints, the spec, and the project guidelines. We will launch NEX from the folder above
it, as you typically would when juggling several projects.
Teaching NEX the Project Rules
NEX.md is NEX's local instruction file: place one in the directory you launch NEX from,
and its content is picked up automatically on every prompt. It is the natural home for the
standing instructions you would otherwise repeat, and we are leveraging it in this tutorial.
Since we launch NEX from the workspace root, our root NEX.md is a one-paragraph pointer to
the active project, and the project's own NEX.md carries the working rules:
# CPU FPGA prototype — working rules

- The project specification in `docs/prototype-spec.md` is **authoritative** for all
  requirements (clocking, latency budgets, signoff criteria). Consult it before making
  engineering decisions.
- Use the Vivado MCP tools for all project, synthesis, implementation, and reporting steps.
- `rtl_staging/ibex_*.sv` and `rtl_staging/prim_*.sv` are third-party IP: **do not modify
  them**. Changes belong in `cpu_wrapper.sv`, `fpga_top.sv`, or the constraints.
- Vivado projects go under `build/` — never inside `rtl_staging/`.
- After every RTL or constraint change, re-run synthesis and implementation and report the
  post-route worst negative slack (WNS) before drawing conclusions.
- Summarize timing results as: target, WNS, achieved fmax, critical path (start → end).
Note that the rules say how to work, not what to build. The requirements live in the spec, and the two parts that will matter in this tutorial are:
## Clocking
- `clk_i`: **60 MHz** system clock. [...]

## Debug features
- The bus debug signature (`bus_sig_o` logic in `cpu_wrapper.sv`) is prototype-only debug
  logic. Its value may lag the observed bus by **up to four clock cycles**; the post-mortem
  software that reads it tolerates this latency.
Building the Project and Getting a First Report
From the workspace root, start NEX with the FPGA Manager agent:
First, let NEX know about the project environment and ask for a baseline, without any fixing yet:
Set up a Vivado project for our CPU FPGA prototype in riscv-soc-prototype/: project under
riscv-soc-prototype/build/, RTL sources in riscv-soc-prototype/rtl_staging (synthesis top:
fpga_top, part xc7a100tfgg484-1, constraints in riscv-soc-prototype/constraints/). Run
synthesis and implementation and report the timing results following the project conventions.
The FPGA Manager hands the heavy lifting to the Vivado agent, which creates the project, adds the sources and constraints, and runs synthesis and implementation. You can follow every step in the conversation without ever scrolling through raw Vivado logs.
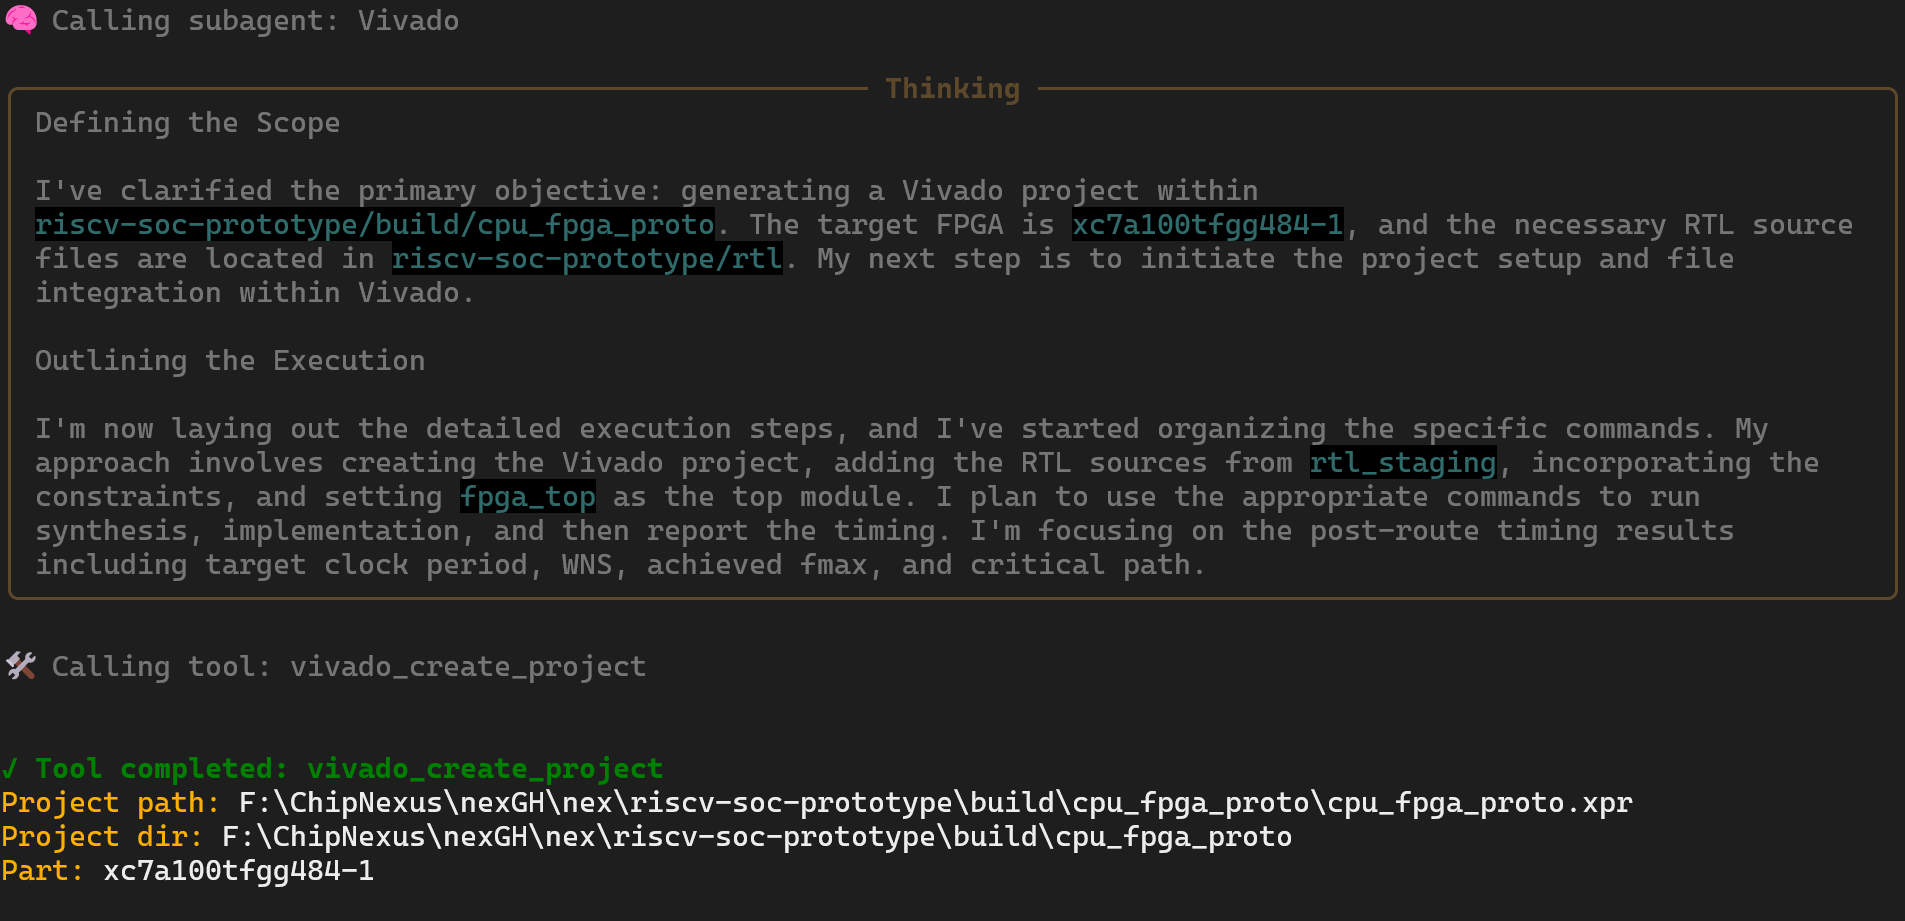
The run completes, and NEX reports back. Implementation succeeded, timing did not:
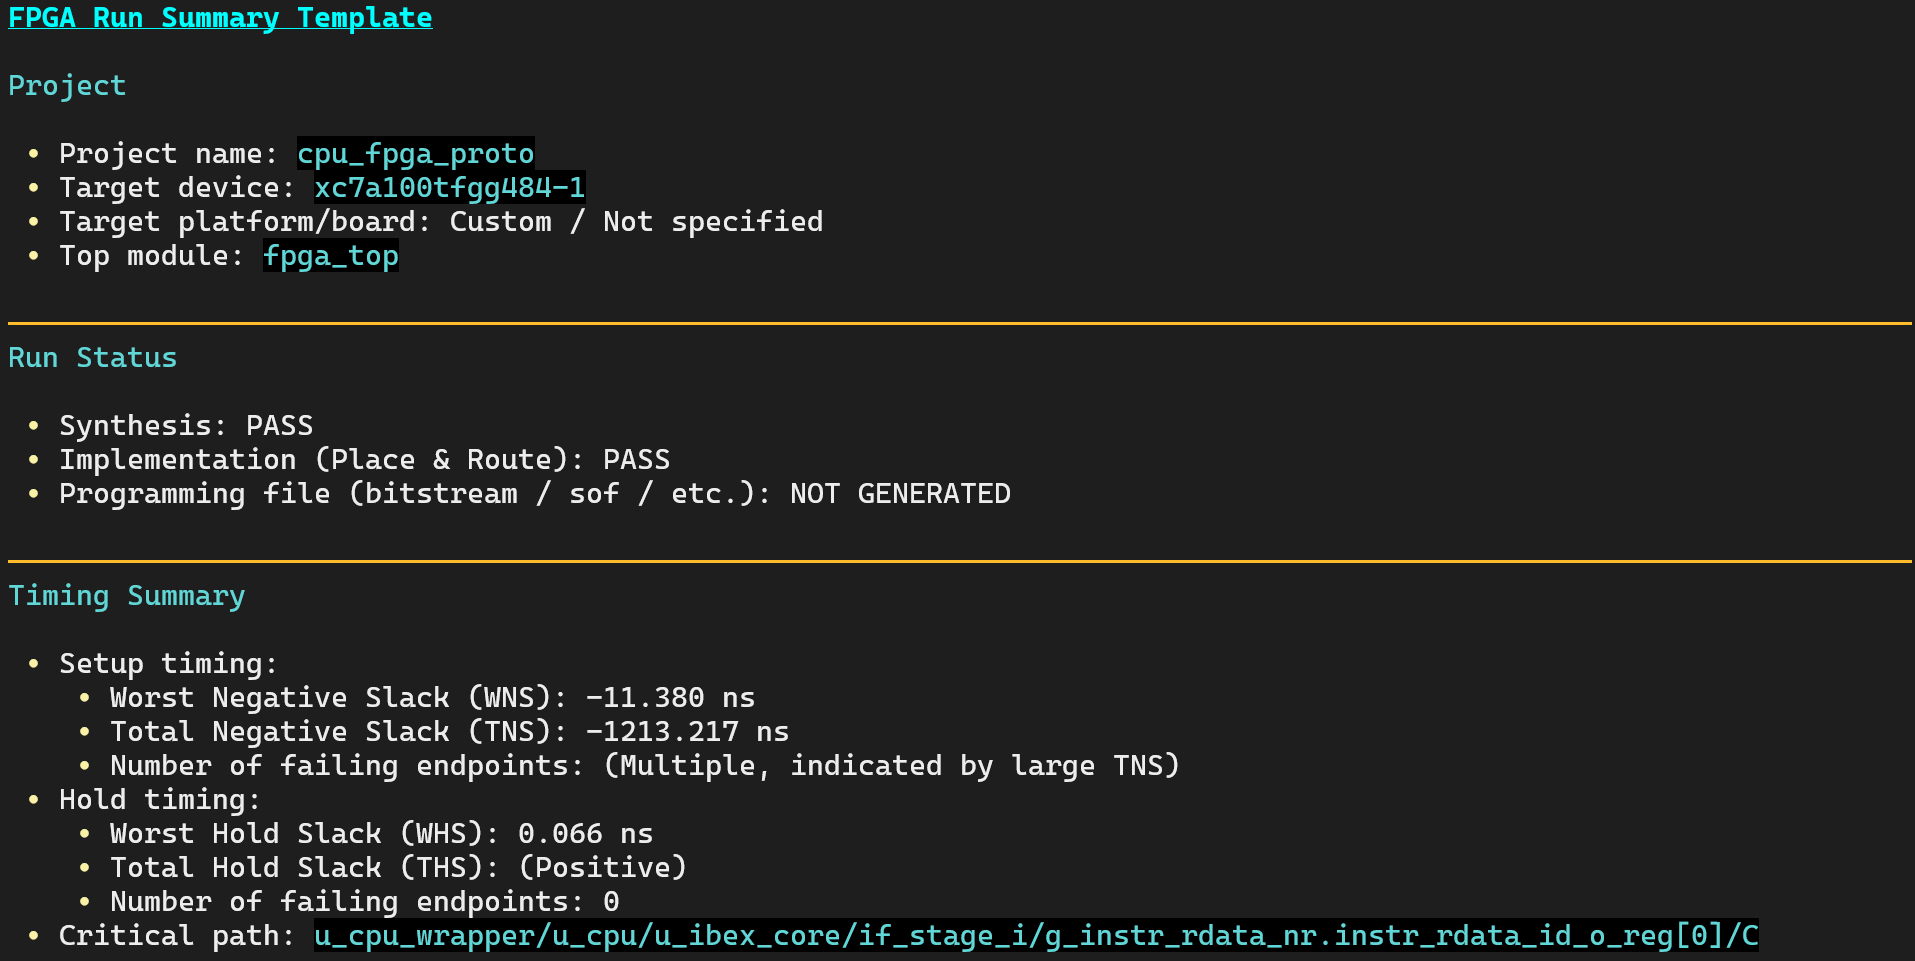
Setup fails by a mile (WNS −11.380 ns, TNS −1213 ns), hold is fine, and the critical path
starts in the CPU's fetch stage and ends at sig_q_reg, inside the team's own wrapper.
Diagnosing the Failure
Next, ask for understanding rather than action:
Diagnose the timing failure precisely: what exactly is failing and why? What are our options
to fix it, and which one do you recommend?
NEX walks the failing path end to end, and shows you the offending source code: the
wrapper's debug signature computes its hash in a combinational for loop, which unrolls
into eight cascaded 32-bit adders in a single cycle. Stacked on top of the CPU's own
address arithmetic, that is nine full carry chains and 76 logic levels against a 16.666 ns
budget. No placement or routing effort can save a path like that; the depth is structural.
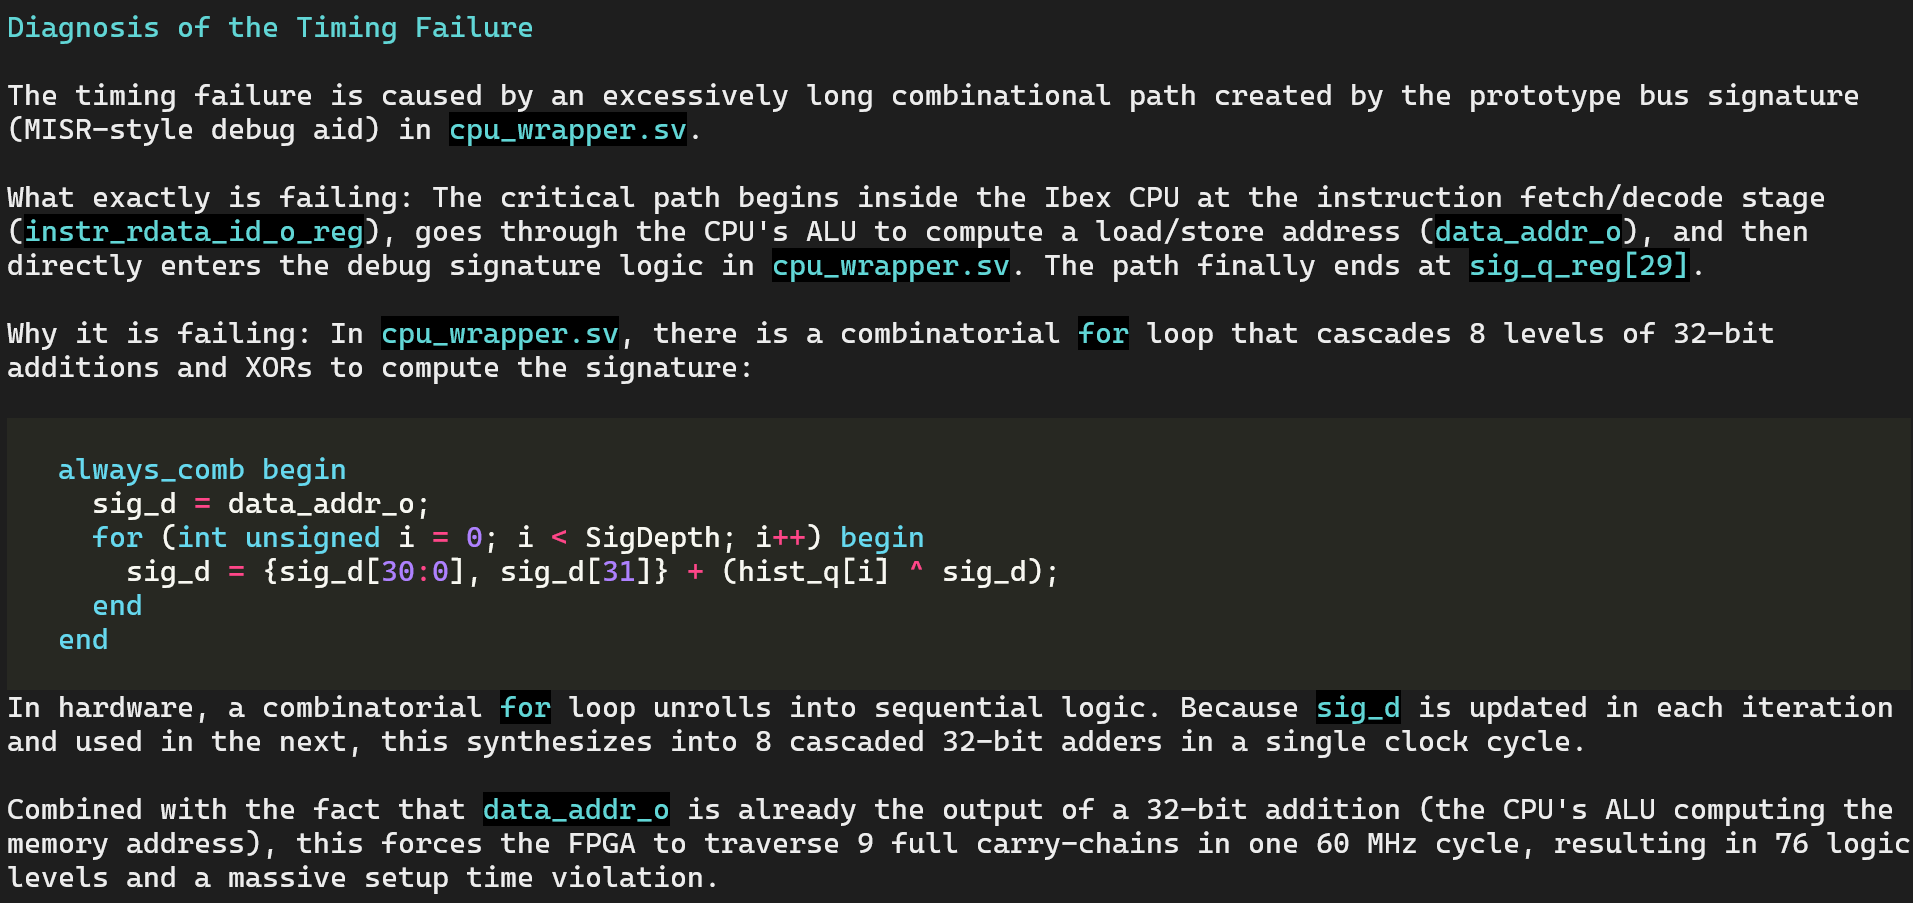
Then it lays out the options. The CPU IP is off-limits, so everything must happen in the wrapper:
- Pipeline the signature's inputs: register the bus tap to decouple the CPU's ALU from the debug logic.
- Replace the hash algorithm with a true hardware MISR: additions are slow in FPGA fabric; a real Multiple-Input Signature Register is an LFSR built from bitwise XORs, one logic level instead of a carry cascade.
- Spread the fold over multiple cycles: hardware-friendly, but overcomplicates prototype debug logic.
Its recommendation: combine 1 and 2. And it justifies touching the algorithm at all by what the spec says the signature is for: a post-mortem debug hash with a latency allowance, not a bit-exact reference. This is the heart of the tutorial: the fix follows from understanding both the silicon and the requirement.
Fixing and Verifying
Approve the plan and let NEX close the loop:
Apply your recommended fix and iterate until the design meets the spec. Report the final
WNS after implementation and summarize all changes you made.
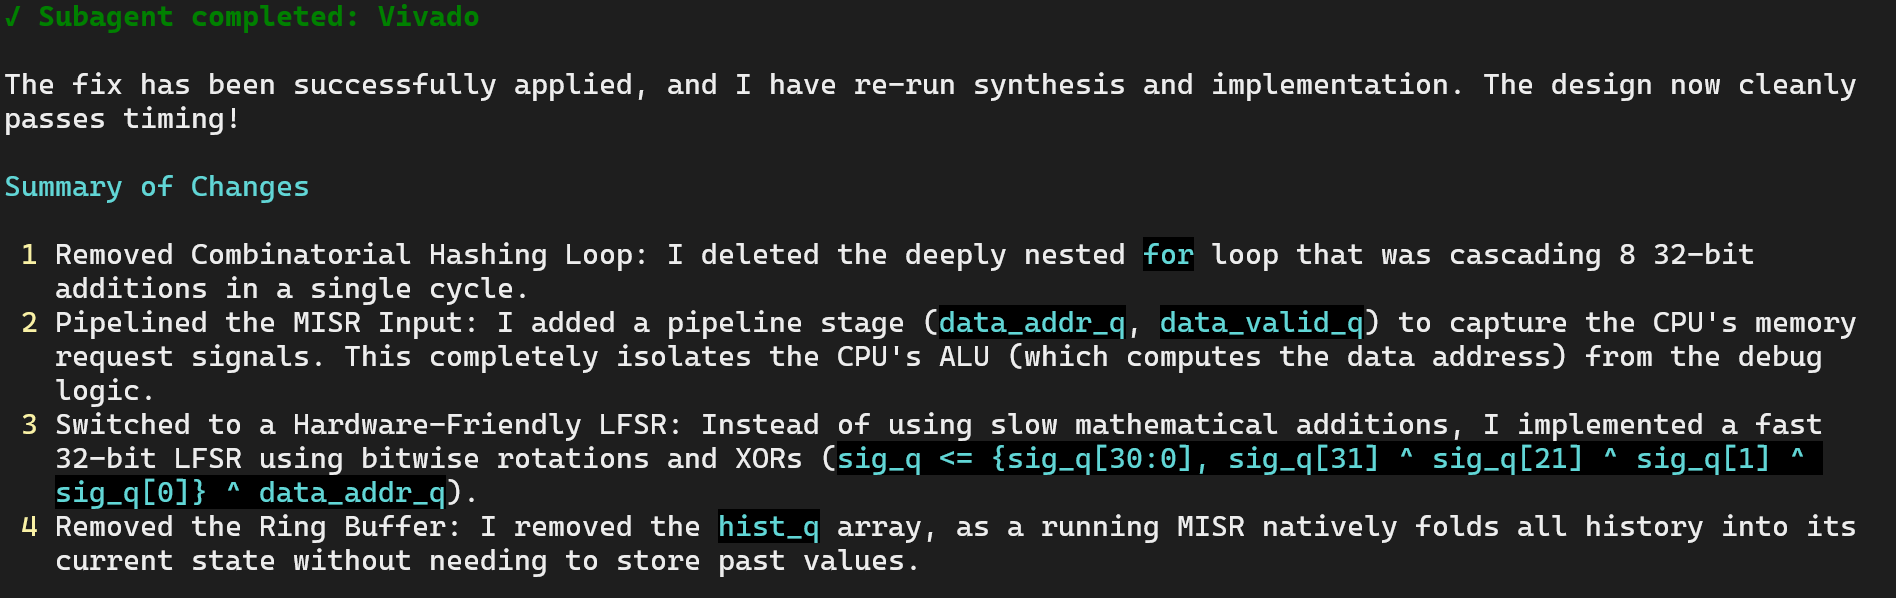
NEX rewrites the signature block in cpu_wrapper.sv, the one RTL file the rules allow it
to touch. The patch tells the story in two halves: the software-shaped implementation goes
(the ring buffer, the pointer, the combinational fold loop), and hardware-shaped logic
takes its place: a pipeline register on the bus tap, spending one cycle of the spec's
four-cycle allowance, and a true MISR built from shift and XOR:
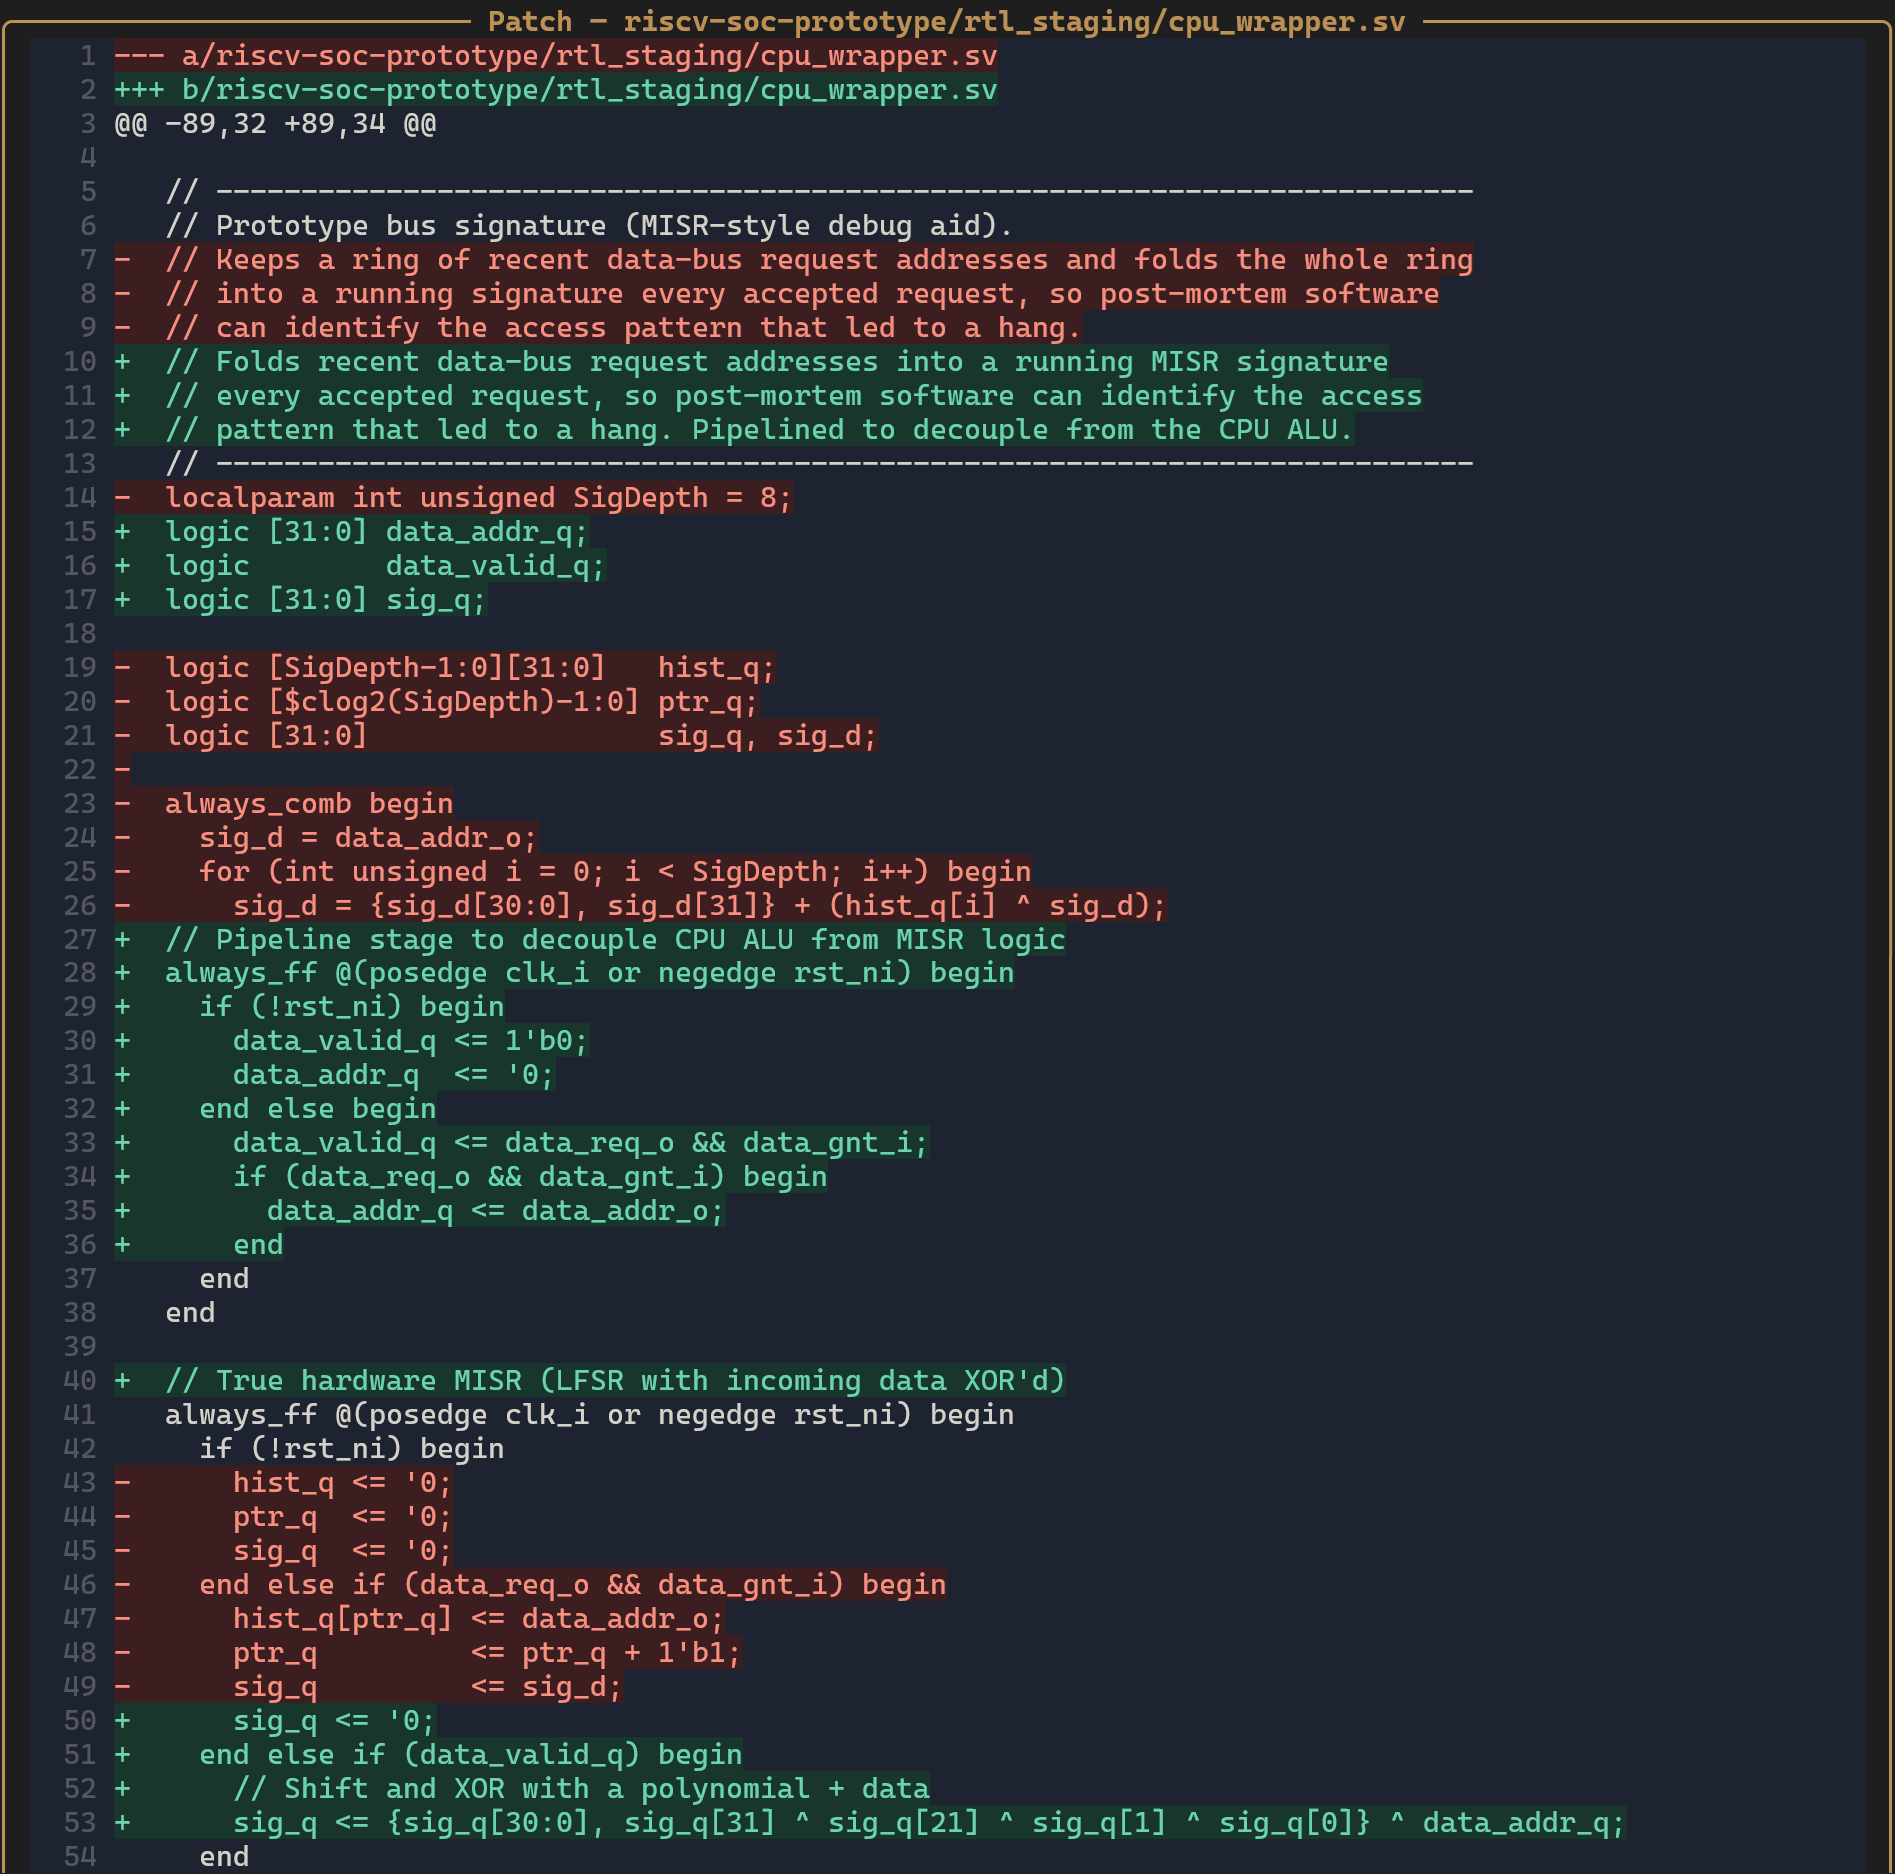
The Vivado agent re-runs synthesis and implementation and comes back with the change summary:
And timing closes with room to spare:
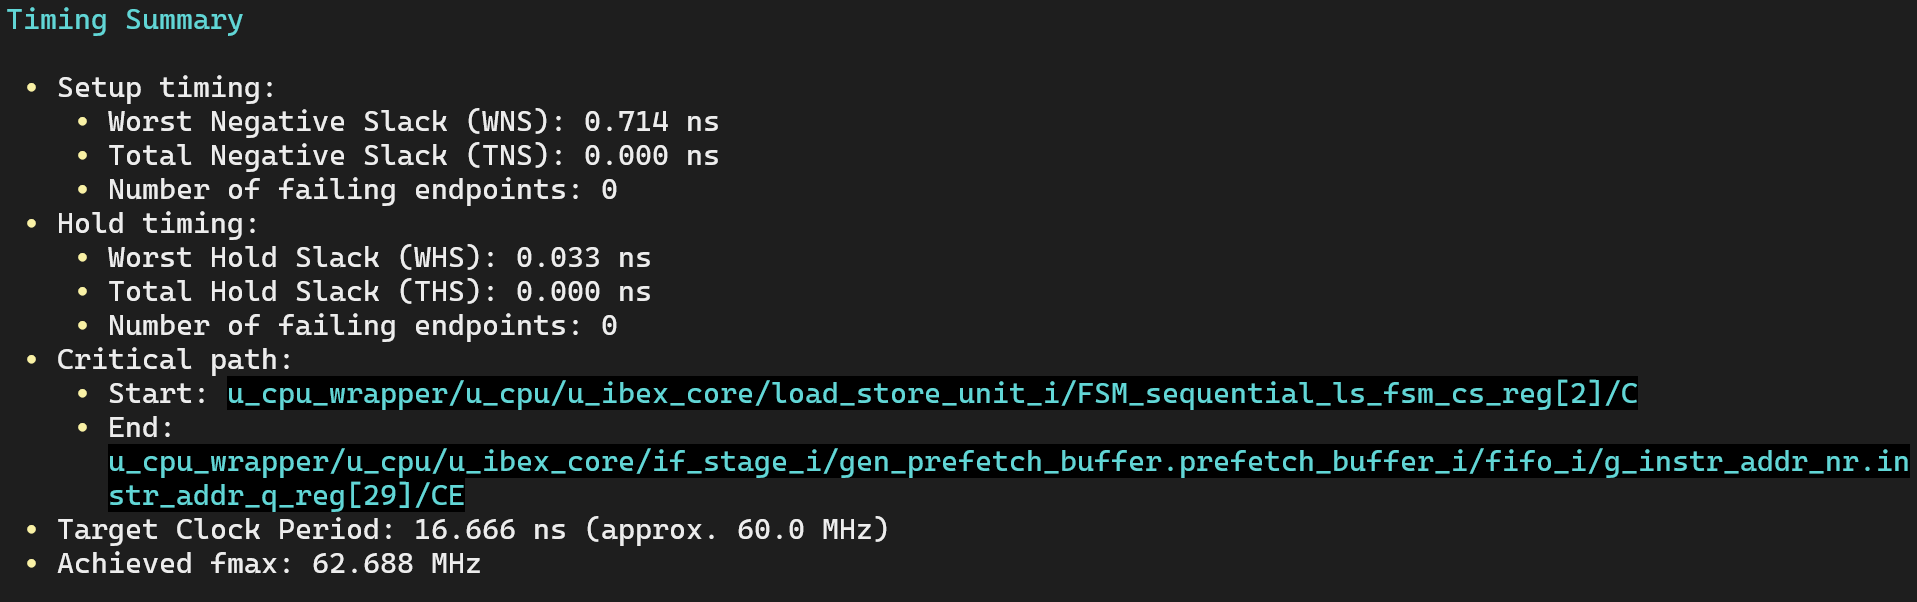
The critical path now runs entirely within the Ibex core, from the load-store unit to the prefetch buffer. With WNS at +0.714 ns, the 60 MHz target is met, and the wrapper's debug logic is no longer limiting timing. Bottom line: the design's speed is set by the IP you chose, not by accidental logic depth.
What Did This Cost?
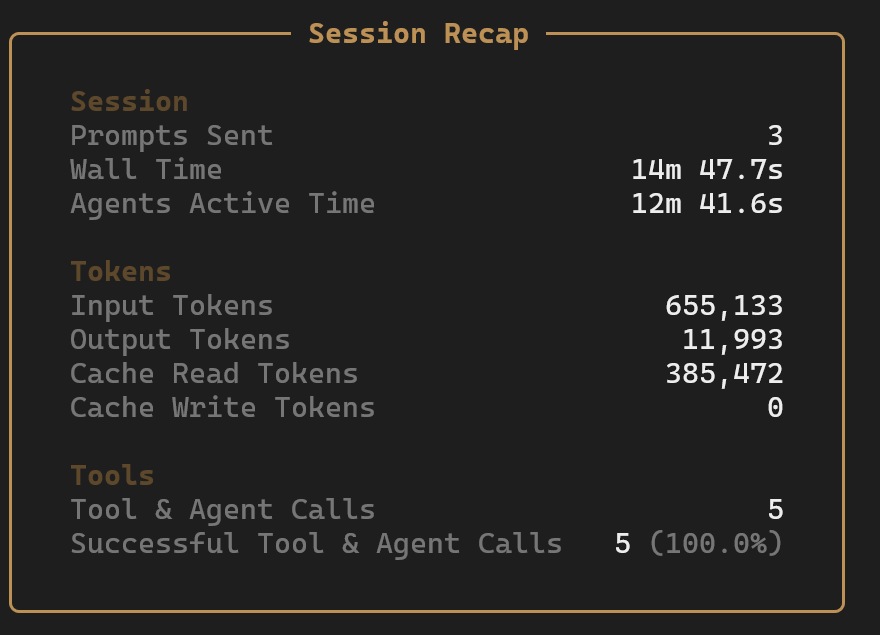
The entire closure, two full synthesis-and-implementation runs included, took under fifteen minutes of wall time, with the agents active for about twelve of them and every tool call succeeding.
Video Recap
Takeaways
- Three short prompts covered the whole loop: build and report, diagnose and recommend, fix and verify. Splitting the work this way keeps the review points where you would want them with any engineer: after the report, and after the recommendation.
- Make sure to leverage
NEX.md, the local instructions file. The working rules and the pointer to the project spec rode along automatically with every prompt, which kept the prompts themselves short while NEX grounded its decisions in the project's actual requirements.